Good water simulation should have at least the following features:
- True reflection (with correct parallax)
- Clipping of underwater objects on reflection image
- View angle dependent transparency/reflectivity of water
- Ripples and/or waves
- Water scattering (i.e. water becoming gradually opaque as depth increases)
- Refraction
- Caustics - i.e. light spots at the bottom of shallow water
- Reflected light - i.e. light spots reflected to objects near water
Here I will describe the mathematics behind the scenes and give step-by-step guide to writing your own water system/object/rendering pass.
1.Rendering reflection texture
Water without reflection looks totally uninteresting - just like any other semitransparent surface. Thus we start from implementing reflection and later go on to other effects.
1.1. Parallax
Even if you have until now managed to render you scene in single pass, from this point on you need at least two passes (actually at least N+1, where N is the number of visible reflective surfaces).
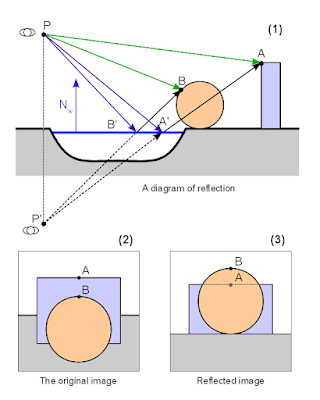
The reason is, that unfortunately we cannot recycle our main scene image for reflections. First because it could make view frustum insanely large (for example - if viewing the water surface from high angle we see only ground and water in our main view, but mostly sky in reflection). And second because of parallax. The reflection is unfortunately not the perfect copy of reflected scene, but copy of the view of the same scene from different viewpoint. The following image illustrates this.
 |
| A diagram explaining the parallax effect on reflected image |
It means that you need to have rendering to texture set up and working. We will render reflection to texture and later use this texture while rendering the water surface in main scene.
Thus, to get reflection texture we first have to render our scene from the reflected camera viewpoint P' to texture. First we have to find the reflected camera position - or more precisely the reflected view matrix (because we need camera orientation too in addition to the position).
This can be done with the following formula:
M'camera = Mreflection * Mcamera
Where Mreflection is the reflection matrix of mirror surface. It can trivially be calculated from the position of reflection plane:
              | 1-2Nx2   -2NxNy  -2NxNz  -2NxD |
Mreflection = |  -2NxNy 1-2Ny2   -2NyNz  -2NyD |
              |  -2NxNz  -2NyNz 1-2Nz2   -2NzD |
              |    0       0       0       1   |
Where (Nx,Ny,Nz,D) are the coefficients of plane equation (xNx + yNy + zNz + D = 0). Notice, that (Nx,Ny,Nz) is also the normal vector of given plane.
Mcamera is the transformation of camera as if it would be "normal" object in scene. To get ModelView matrix you will need the inverse of it.
1.2. Mirrored geometry
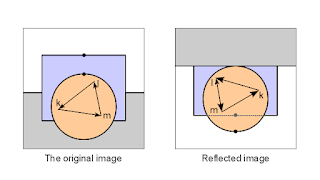
Actually we cheated a little in the previous image. We rotated the mirrored image 180º to make it more similar to the original image, so the effect of parallax can be seen. The actual mirrored image looks like this:
 |
| Different winding order on mirrored image |
This may or may not be problem for you. If all your materials are double sided (i.e. you do not do back face culling) or if you can set up rendering pipeline in such a way, that you can change culling direction it is OK. In my case though, I prefer to keep culling always on and have forward-facing always defined as CCW. So something has to be done with the reflected image - or otherwise geometry will not render properly.
We will exploit the feature that camera is always (at least in most applications) rectangular and centered around view direction. Thus we can just flip camera in Y direction and the winding order will be correct again (it flips reflected image so it looks like (3) on the first picture).
This can be done with one more reflection matrix:
M''camera = Mreflection * Mcamera * Mflip
Where Mflip is simply another reflection matrix that does reflection over XZ plane.
Now if we render mirrored image using M''camera as camera matrix, pipeline can be left intact. We, of course, have to save this matrix for later reference, because it is needed to properly map our texture to water object in main render stage.
1.3. Underwater clipping
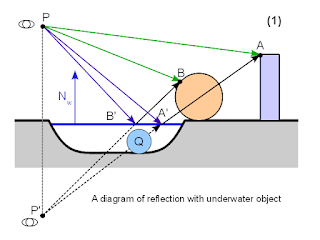
Take a look at the following picture:
 |
| A reflection with underwater object |
We have added an underwater object Q to our scene. Now it should not appear on reflection, because it does not block the actual reflection rays PB'B and PA'A. But we are not doing ray-tracing. We are instead moving camera to mirrored viewpoint P' and rendering reflection like normal image. But as you can see, the object Q blocks ray P'A'A and thus would show up in our reflection.
Thus we have to make sure, that nothing that is under the reflection plane (water surface) will show up in mirror rendering. This can be achieved in three different ways:
- Use additional clipping plane on GPU. It can be very fast or very slow - depending on card and driver used.
- Use oblique projection matrix during reflection rendering. You can read more about it here. This is cool technique, but personally I have never got it to work well enough because it messes up camera far plane.
- Clip manually in pixel shaders. It wastes some GPU cycles, but is otherwise easy and foolproof.
uniform vec4 clip_plane;
varying vec3 interpolatedVertexEye;

void main()
{
    float clipPos = dot (interpolatedVertexEye, clip_plane.xyz) + clip_plane.w;
    if (clipPos < 0.0) {
        discard;
    }
...
}
Of course you have to supply your shader with clip_plane and calculate interpolatedVertexEye in vertex shader (it is simply vertex coordinate in view/eye space: VertexEye = Mmodelview * Vertex). If you do not need clipping, simply set clip_plane normal (xyz) to zero and all pixels will be rendered.
1.4. Putting it all together
Before starting the main render pass (being it forward or deferred) do the following:
- Create list of all objects that need reflections (and the parameters of all reflection planes). Then for each reflection plane:
- Calculate the reflected camera matrix
M''camera = Mreflection * Mcamera * Mflip - Set up camera matrices (you can optimize rendering by using clipped projection matrix, but this will not be discussed here).
- Set clipping plane to reflection plane
- Render full scene
- Save the rendered image as texture to be used with reflective object
This is actually quite easy - provided that you have at hand all necessary parameters. You have still to decide at which render stage to do this. I use transparent stage, as water is basically just one semi-transparent surface in scene, but you can add another pass before or after transparency as well.
You will need at hand:
- Reflected camera matrix M''camera
- Projection matrix you used to render reflection Mprojectionreflection (normally this is the same projection that you use for main camera)
- Reflection texture
attribute vec3 vertex;

uniform mat4 o2v_projection;

varying vec3 interpolatedVertexObject;

void main()
{
	gl_Position = o2v_projection * vec4(vertex.xy, 0.0, 1.0);
	interpolatedVertexObject = vertex;
}
We add another constraint here - water surface will be at XY plane of the object local coordinate system. It is strictly not necessary if you have the proper reflection plane, but I found it easier that way. Just use XY plane as reflection plane and place your object (water body) appropriately.
Actually this allows us to do another cool trick. We can use the bottom of water body (i.e. river, lake..) as our water object. It will be flattened in shader, but we can use the Z data to determine the depth of water at given point. But more about this in next part.
o2v_projection is simply my name for composite matrix Projection * ModelView. I prefer to name matrices with mnemonic names, describing the coordinate system transformations they do - in given case it is Object To View, multiplied with Projection.
interpolatedVertexObject is simply vertex coordinate in object local coordinate system - we will need it to do lookup onto reflection texture.
2.2. Fragment shader
uniform mat4 o2v_projection_reflection;
uniform sampler2D reflection_sampler;

varying vec3 interpolatedVertexObject;

void main()
{
	vec4 vClipReflection = o2v_projection_reflection * vec4(interpolatedVertexObject.xy, 0.0 , 1.0);
	vec2 vDeviceReflection = vClipReflection.st / vClipReflection.q;
	vec2 vTextureReflection = vec2(0.5, 0.5) + 0.5 * vDeviceReflection;

	vec4 reflectionTextureColor = texture2D (reflection_sampler, vTextureReflection);

	// Framebuffer reflection can have alpha > 1
	reflectionTextureColor.a = 1.0;

	gl_FragColor = reflectionTextureColor;
}
o2v_projection_reflection is the composite matrix Projection * ModelView as it was used during reflection rendering. I.e:
Mprojectionreflection * (M''camera)-1 * Mobject
Like the name implies, it transforms from the object coordinate system to the clip coordinate system of reflection camera.
In fragment shader we simply repeat the full transform pipeline during reflection rendering and use final 2D coordinates for texture lookup. For this we need initial, untransformed object vertices - thus they are interpolated from vertex shader (interpolatedVertexObject).
I'll set reflection alpha to 1.0 because I use HDR buffers and due to additive blending the final alpha can have some very weird values there.
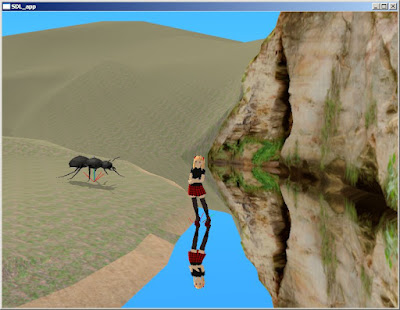
And the rendered image:
 |
| Simple scene from Shinya showing water as perfect mirror |
Not very realistic?
Up to now we have implemented water as perfect mirror. This is very far from reality (look at the feature list in the first section).
In the next parts I will show how to add viewing angle based transparency, water color and depth-dependent ripples to your water.
Have fun!