Wednesday, May 21, 2014

Rigging tutorial 3

This is the english translation of the second part of a rigging tutorial I wrote.


Hand and palm rig

Hands have much more freedom in movement than legs but fortunately they do not need an animation system for "sticking" to ground and rolling over heel like legs do. Thus we can use simpler rig here.

First we create handles that determine the location and direction of palms.
In Edit Mode select the palm bone of left hand and make a copy of it (Shift-D). Because the original is mirrored the copy will be mirrored too. Rename the new bones to IK_Hand_L ja IK_Hand_R.
NB! The new bones are coincident with the original ones thus to select them it may be necessary to right-click two times.

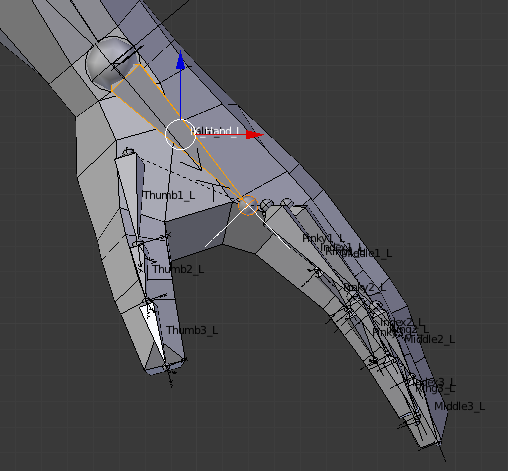
Palm handle in Edit Mode

The new bones are connected to forearm as are hands. We want to make them children of chest and not connected to parent's endpoint so that they move together with upper body but allow us to move them individually as well.
Select IK_Hand_L, confirm that the Connected checkbox is disabled and chose chest bone on the Parent field. Repeat the same procedure with the handle of right hand.

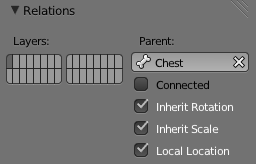
Bone properties panel for IK_Hand_L

Now change the shape of handles to something more intuitive, for example flat box roughly the same shape as hand.

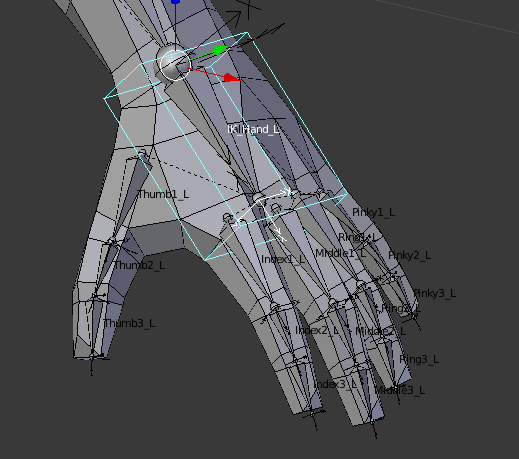
The shape of palm handle

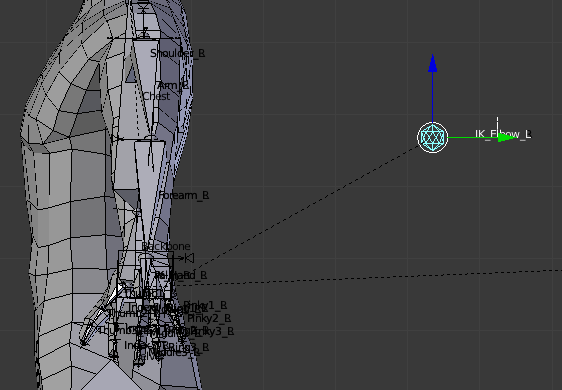
Like the one of leg the IK chain of hand needs an additional handle that determines the direction of elbow. We create it as a child of hand IK handle IK_Hand_L/R.
In Edit Mode select the endpoint of IK_Hand_L and create mirrored bones (Shift-E) extending backwards. Rename these new bones to IK_Elbow_L ja IK_Elbow_R.
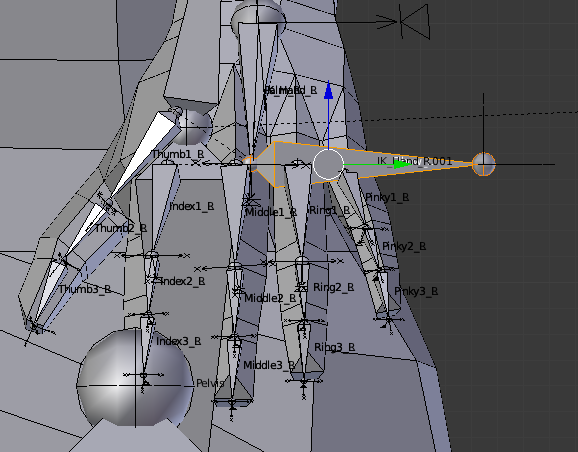
Creating IK_Elbow_L

Give them some intuitive shape (for example the same as knee targets), switch off Connected checkbox on Bone Properties panel and them move these to about 1m behind elbows.

IK_Elbow_L location

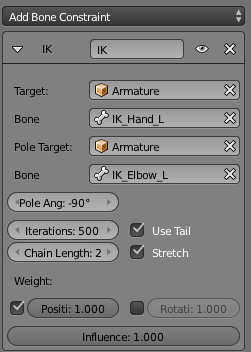
Now select the left forearm in Pose Mode and add Inverse Kinematic constraint to it.

Chose IK_Hand_L as target and IK_Elbow_L as Pole Target. The length of the cain is two bones. Although shoulder has to move together with the arm, it does not animate well if attached to the IK chain. Thus we will animate it manually.
If the elbow will twist to unnatural direction change the Pole Angle value (-90, 90 or 180 degrees) so that elbow would point to IK_Elbow_L.

Arm IK chain properties

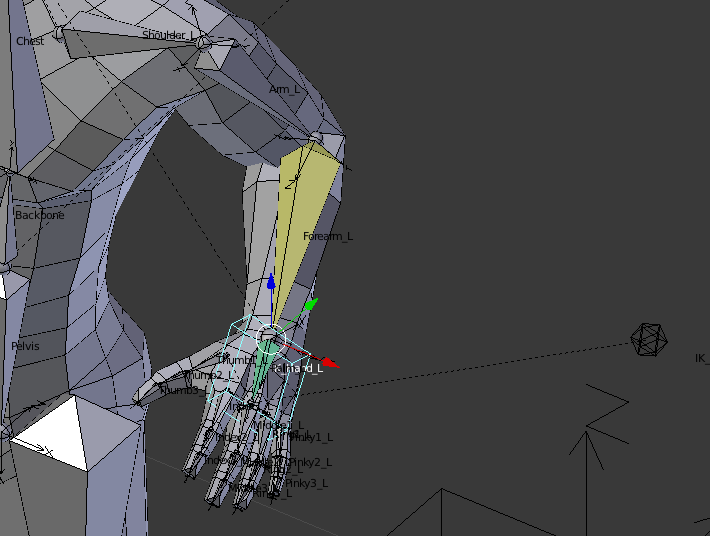
Select the palm handle and drag it around. Hand should move along with it trying to keep the wrist at the starting point of palm.
Create similar same IK constraint for the right arm.
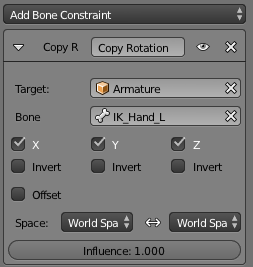
Next we have to make a hand to follow not only the location but also the rotation of IK_Hand_L/R so it can be turned easily by turning the handle.
Select the bone of the left palm, add Copy Rotation constraint to it and select IK_Hand_L as target bone.

Copy Rotation constraint of the left hand

Confirm that if the handle is rotated the palm rotates along.

Positioning arm and hand by IK handle

Add a similar constraint to the right palm.
The rig of arms is now complete.
Notice that the elbow targets IK_Elbow_L/R move together with palms. In most "normal" arm positions it places elbows quite naturally but time to time we have to adjust it by hand to position elbows the correct way.

Finger rig

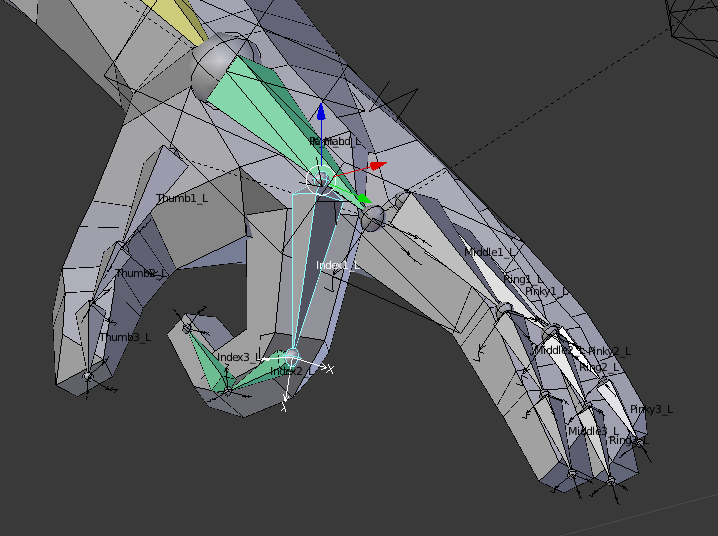
Animating all finger bones individually is hard and time-consuming. In most situations fingers do not move separately but bend together into fist of if grabbing objects. To make creating such animations easier we add Copy Rotation constraint to all finger bones.

Select the second bone of left index finger and add Copy Rotation constraint to it. Select the first finger bone as target. Enable the Offset checkbox so it can rotated individually if needed. At last select Local Space from both coordinate system field (Space).

Finger constraint panel

Add similar constraint to the third bone choosing the second as target.
Confirm that if the first bone of the index finger is turned the whole finger curls.
 
Bending of rigged finger
NB! For the finger bones to turn naturally the same local coordinate system axes (either X or Z) have to be aligned with the anatomical rotation axis for all finger bones.

Repeat the same procedure for other fingers and thumbs.

Now there is an easy method to curl fingers individually. In real animations all fingers of the same hand usually move together. To simplify such movement we create helper bone that bends all fingers together.

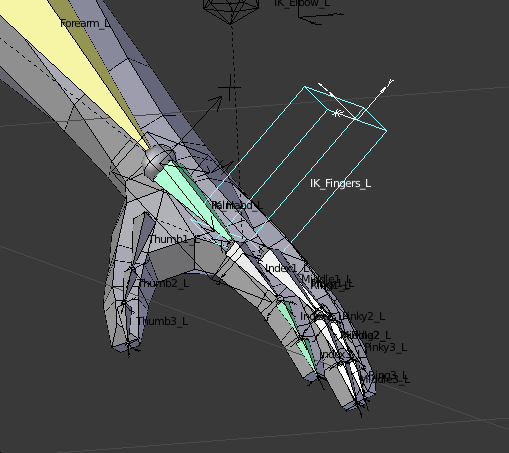
In Edit Mode select the end of the left hand bone and create mirrored bones (Shift-E) extending upwards from the hand at right angle. Rename these to IK_Fingers_L and IK_Fingers_R. Adjust the Roll field at Bone Properties panel so that the local X axis of it is aligned with the X axes of the finger bones.

Finger handle

Give a more intuitive shape to the new bone, for example a flattened box.

Finger handle shape

Now add Copy Rotation constraint to the first bones of all fingers using the new bone (IK_Fingers_L/R) as the target. Like for finger bones enable Offset checkbox and chose Local Space for both coordinate systems.

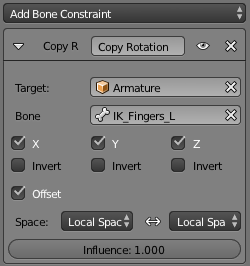
Finger handle constraint panel

Confirm now that by rotating IK_Fingers_L/R the hand bends into fist.

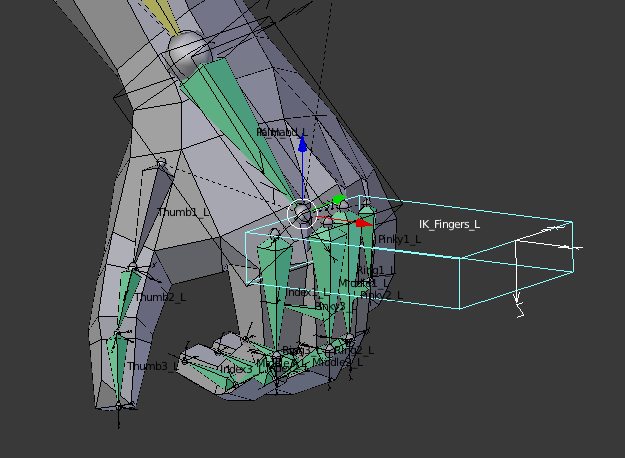
The action of finger handle

The hand rig is now complete.

Upper body rig

Normally the bones of upper body (backbone and chest) do not bend individually. Also neck and head tend to bend together with upper body. For animation rig we make chest and neck to copy the rotation of backbone but keep head separate.
Select chest and add Copy Rotation constraint to it. Select backbone as target, enable Offset and chose Local Space on both coordinate system fields.

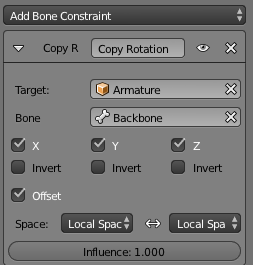
Chest constraint panel

Add similar Copy Rotation constraint to neck selecting chest as target.
Confirm that by bending or turning backbone the whole upper body bends. Because Offset is enabled we are able to move chest and neck individually as well.
The upper body rig is now complete.

Eyes

Animating eyes by hand is hard because even slightest difference between the movement of left and right eye makes character squint. To make it easier we add additional bone and make it to be the target that the character looks at. We create it as a child of Base so that even if we change the body position (either by COG, backbone or head) eyes will always look at the same point.
In Edit Mode select the end of Base and create a new bone. Disable Connected checkbox and rename it to IK_Eyes.
Move it to about 1,5m in front of and 20 cm below eyes. Give it a more intuitive shape (for example the same as knee handles).

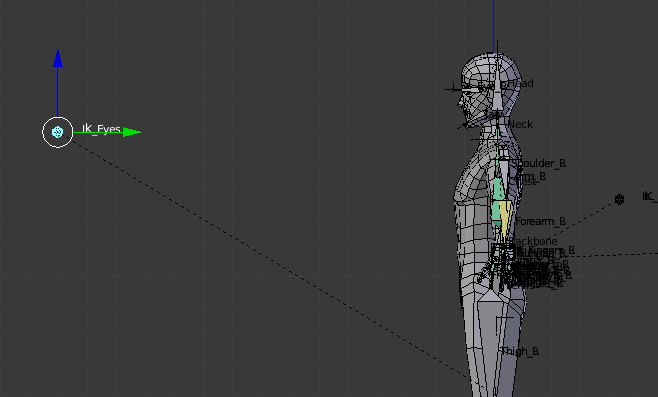
The placement of IK_Eyes

Now select the bone of left eye and add Track To constraint to it. Chose the new bone(IK_Eyes) as the target. Because eyes are normally symmetrical we do not need to set up direction (default global Z will work).

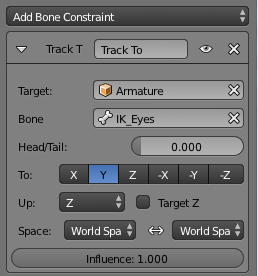
Eye constraint panel

Add similar constraint to the right eye.
Confirm that by moving IK_Eyes the character looks at it (it should work also if we bring the target closer to face).
The eye rig is now complete.

Finalizing

Move all rig handles to separate skeleton layer.

  • Movement
  • Base
  • IK_Foot_L/R
  • IK_Toe_L/R
  • IK_Knee_L/R
  • IK_Hand_L/R
  • IK_Elbow_L/R
  • IK_Fingers_L/R
  • IK_Eyes_L/R

All skeletal bones (the ones associated wit the mesh by weights) should go to another layer. Helper bones that are never animated directly go also to separate layer.
In addition to IK handles we will animate the following skeletal bones:

  1. Pelvis
  2. Backbone
  3. Chest and Neck (if needed)
  4. Shoulders
  5. Individual finger bones (if needed)
  6. Head
  7. Jaw

Try to move all abovementioned bones and confirm that the character moves as expected.

The simple animation rig is now complete.

Thursday, May 15, 2014

Rigging tutorial 2

This is the english translation of the second part of a rigging tutorial I wrote.

Leg and foot rig

Leg and foot rig requires several additional bones. Three of these are IK "handles" which are manipulated during animation and three are invisible targets used internally by IK solver.

Targets

We normally want major skeletal bones to be connected and placed in anatomically correct way (foot attached to shin, toe attached to foot) to avoid unnatural stretching of body. On the other hand rigging requires targets to be attached to handles so they move together in animation. Thus we have to add three additional invisible bones that will determine the placement of heel, foot and toes.

Select the skeleton, switch to Edit Mode and select the endpoint of left shin (heel). Create mirrored bones (Shift-E) that extends 20cm backwards. Rename these new bones to Tgt_Heel_L and Tgt_Heel_R.

Tgt_Heel_L placement

In similar way create a pair of bones at the end of foot and another pair at the end of toe. Rename the first to Tgt_Foot_L/R and the second to Tgt_Toe_L/R.

The placement of foot and toe targets

These are the targets of leg IK solver. Later we connect these to a proper parent bones and move to an invisible skeleton layer because these are never animated directly.

Handles

The most important one is foot handle that determines the placement of heel and the direction of foot.
Select the endpoint of left shin (heel) and create pair of bones (Shift-E) extending about 20cm forwards. Rename these to IK_Foot_L and IK_Foot_R.

IK_Foot_L

Foot handle has to be the child of Base and it has to lay exactly and ground level. It's origin has to be at the "rolling" point of heel (the back border of heel mesh) and endpoint below the toe joint.
Switch to wireframe mode (Z) and select IK_Foot_L.
From the bone properties panel switch off Connected checkbox and from Parent menu select Base as the new parent.

Bone Properties panel

Repeat the same procedure with the mirrored partner (IK_Foot_R).
Now select IK_Foot_L again and move it exactly to the ground level, then place the origin to the back edge of the heel and stretch the endpoint to below the toe joint.

The placement of IK_Foot_L
From the end of IK_Foot_L create mirrored bones (Shift-E) extending forwards. Rename these to IK_Toe_L and IK_Toe_R.

IK_Toe_L

Assign more intuitive shapes to all handles. Simple blocks below ground will do.

Shaped foot and toe handles

Now we have to set up the proper hierarchy of target bones.
Disconnect Tgt_Heel_L (disable Connected checkbox) and set it's parent to IK_Foot_L.

Bone Relations panel

Do the same for Tgt_Heel_R (it's parent is, of course, IK_Foot_R).
Disconnect Tgt_Foot_L/R and set their parents to IK_Foot_L/R.
Disconnect Tgt_Toe_L/R and set their parents to IK_Toe_L/R.
All target and handle bones are now properly placed and connected.

Next we create the main IK chain of leg.
Select left shin and add Inverse Kinematics constraint from Bone Constraints panel.

IK constraint panel

On Target field select the armature object. On the new field Bone that appears select heel target (Tgt_Heel_L)
Set the length of the chain to 2 bones (thigh and shin).
Confirm now that by moving foot handle (IK_Foot_L) the whole leg bends, trying to keep the heel joint at the place determined by heel target bone.
Unfortunately sometimes leg twists unnaturally because IK solver does not "know" at which direction the knee should bend. To solve this we add two "handles" that determine the direction of knees.

Select the end of IK_Foot_L and create mirrored bones (Shift-E). Rename these to IK_Knee_L and IK_Knee_R.
For both created bones disable Connected on Bone Properties panel and move them to a place approximately in front of the knees.

The placement of knee targets

Select again the shin of the left leg. On Bone Constraints panel set Pole Target to the armature object and corresponding bone to IK_Knee_L.
Depending on how the local coordinate system of thigh bone is oriented the knee may now twist 90-180 degrees. Pole Target orients one of knee axes (default X) to the target object and if the X axis is, for example, oriented sideways the knee twists.

Twisted leg

If the bone is twisted change the Pole Angle field to either 90, 180 or -90 degrees until the knee is oriented correctly (by modifying this field we force some other local direction is oriented towards pole target instead of X axis).

Adjusting Pole Angle
Now change the shape of knee handles to something intuitive (for example icosahedron).

Knee direction handle

Confirm that by moving knee handle left and right the leg rotates so that the knee is always oriented towards the handle.
The main IK chain of left leg is now complete. Identical chain has to be created for right leg as well.

Rotating feet


Incorrect foot orientation

To guide the turning of foot ensure first that the local Z axes of foot and toe bones is oriented upwards. If they are not (like on figure) select the bone, switch to Edito Mode and adjust the Roll value on Bone Properties panel.

Bone Roll setting

Repeat the same procedure with toe bone if needed.
Now switch to Pose Mode and add Track To constraint to the left foot. On Target field chose the armature object and on Bone field Tgt_Foot_L. Enable Target Z checkbox so that the local Z-axis of foot would always be oriented as close as possible to the local Z-axis of target bone.

Track To constraint panel

Confirm now that if the foot handle(IK_Foot_L) is rotated the foot rotates with it.

Now select the toe bone (it is easier to do that in wireframe mode) and add Track To constraint to it. On Target field select armature object and on Bone field Tgt_Toe_L.
Confirm that if the toe handle is rotated toe rotates.
Add similar constraints to the right foot as well.

The IK of legs is now complete.

The hierarchy of skeleton root should be following:

The root of armature hierarchy

The third part of the tutorial: arms, upper body, eyes

Wednesday, May 14, 2014

Rigging tutorial 1

I have been teaching analytical geometry and low-poly modeling in local art school for three years now.
This is the english translation of the first part of a rigging tutorial I wrote. Other parts will follow as soon as I have time to translate them.

Introduction


This tutorial shows how to build very simple animation rig of humanoid character. The rig allows easy creation of walkcycle, articulating hands and fingers and adjusting eyes. Much more advanced rigs are normally used in serious animation, but we keep things simple so the general ideas and methods can be understood more clearly. Hopefully everyone is able to build on top of this tutorial to make the rig more powerful.
We start with a normal humanoid skeleton that is attached from COG. I.e. the rootmost bone is the center of gravity of the character, placed inside the body somewhere near belly button. Immediately from COG upper and lower body branch – the lower body starts from pelvis and upper from backbone.

Terms


  • Forward kinematics (FK) – an animation method were each bone is rotated (moved, scaled) individually by animator. Associated mesh then is deformed according to the weights. Forward kinematics is inconvenient for animating bone chains (e.g. limbs) because one has to adjust the rotation of each constituent bone in keyframes to keep the chain moving properly (for example keeping feet attached to ground).
  • Inverse kinematics (IK) – an animation method where additonal bones and constraints are added to skeleton so that instead of rotationg individual bones one can animate intuitive "handles" or "targets". Special constraints are added to a skeleton so other bones track the locations and rotations of "handles". When a target bone of a limb is moved all constituent bones of the limb bend so that the end is always automatically placed to the point specified by handle.
  • IK in narrow sense involves only automatic calculation of bone angles to keep an end at the place certain target. In wide sense it is often use synonymously to rigging thus including other rules and constraints. For example, a way to bend all fingers together by moving a single handle so that a hand of a model grabs certain object.

Rigging a skeleton


Rigging rules are added to skeleton by creating additional "virtual" bones and defining bone constraints. The latter can be specified individually to each bone from Bone constraints panel.

Bone constraints panel

Constraints used in this tutorial

  • Copy Location – the location (the origin of local coordinate system) of a bone is automatically moved to the location of some other bone (or object). If location offset is enabled the bone can still be moved by user – in such case the relative (animated) offset from the origin is preserved.
  • Copy Rotation – the rotation (the direction of the base vectors of local coordinate system) of a bone is automatically adjusted to coincide with the rotation of some other bone (or object). If offset rotation is enabled the bone can still be rotated by user.
  • Track To – the direction of a bone (the Y basis vector of local coordinate system) is directed to point to some other target bone (or object). In addition to the bone itself the up direction (the direction of Z basis vector) can be specified.
  • Inverse Kinematics – allows one to specify a chain of bones so that all it's bones rotate automatically to keep the end of the chain at specified target. Additionally the direction of bends (joints) can be specified by additional bone (or object).


Handles and targets of simple rig

Additional bones


To rig a skeleton we have to create several additional "bones" that are not bound to the mesh by weights. Instead some of them function as "handles" that intuitively define the movement of other skeletal bones. Others are only used internally by IK algorithms as specific targets of certain bones or chains.
The handles in our rig are:
  • Movement – specifies the horizontal placement of body in walkcycle
  • Base – allows on to switch on/off whether the body tracks Movement or not
  • IK Foot – specifiy the placement and direction of feet
  • IK Toe – rotate toes
  • IK Knee – specify the direction of knees
  • IK Hand – specify the location and direction of palms
  • IK Fingers – bends all fingers together
  • IK Elbow – specify the direction of elbows
  • IK Eyes – specifies the direction of both eyes

Movement and Base


Movement is a "virtual bone" that is used to give horizontal movement to walkcycle. I.e. if the length of the double-step is 1,5m and the character makes one double-step per second, Movement moves forward with uniform speed one meter per second. In starting and stopping animations Movement correspondingly accelerates or decelerates.
Moving character ahead in walkcycle is needed to ensure that the feet "stick" to ground and do not slide forward or backwards.
It is possible to create more advanced rigs where the "sticking" of feet is achieved by special constraints but in given tutorial we keep things simple.

Select the armature, enter Edit Mode, make all skeleton layers visible and make the display mode of bones to be octahedron.

Skeleton in Edit Mode

Armature panel

Movement will be the "handle" that changes the location of the whole skeleton. Thus we have to make it root bone (without parent).
Select the start of COG, switch to side view (NumPad 3) and create new bone (E), extruding it horizontally 1m to the back of the character. In my example it is coincident with COG.
Select the new bone (it's default name is  COG.001) and rename it to Movement.

Movement

Move it to the origin of coordinate system (Shift-S -> Cursor to Center, Shift-S -> Selection to Cursor)

Correctly placed Movement bone

This bone will move the whole character. To make it's role intuitively clear and to distinguish it from other bones we assign it a special shape.
Switch to Object Mode and activate some empty layer (for example the last one). Create a new cube (Add -> Mesh -> Cube).
If object is used as she shape of a bone, the virtual start of the bone is at the origin and the end is 1m along Y axis.
Enter Edit Mode and model the cube into 3D arrow that is placed exactly below XY plane.
NB! Do not move, scale or rotate the object in Object Mode. Only the mesh datablock is used as bone shape and thus transformations in Object Mode have no effect (but they make understanding the actual shape harder).

The shape of movement bone

Rename the object to Shape_Movement.
It is a good idea to rename "helper objects" according to some schema so they can easily be found in lists. In given tutorials the names of all shape objects start with Shape_, animation handles starts with IK_ (except Movement and Base) and IK targets start with Target_.
Switch to Object Mode, enable the layer where the armature is, select the armature and switch to Pose Mode. Now select Movement.

Bone Display panel

From the Display subpanel of Bone Properties panel chose the created object (Shape_Movement) in Custom Shape menu and enable Wireframe display mode.
Now Movement has the same shape as the created object in Pose Mode (in Edit Mode all bones are always shown using default shapes).

A new shape of Movement

The first animation handle is now complete.
If we now change the position of Movement in Pose Mode nothing happens. Before we can bind skeleton movement to it we have to create the next handle called Base.

Base is a virtual bone (handle) that makes it possible to switch the movement of the whole character on and off. It is needed to make the creation of walkcycle animations easier. Whenever we are fine-tuning the body movements during walkcycle we often want to keep the character at one place to ensure that the movement of bones are truly cyclical and smooth.
  • Movement – makes it possible to ensure that feet are "glued" to the ground.
  • Base – disables movement to make the whole animation smoothing easier

Create Base the same way as Movement and move it to the origin.

Base

NB! All bones have default shapes in Edit Mode and thus Movement and Base are completely coincident.
Create a custom shape object for Base – for example a small cube that is placed near the end of the bone (you can use Shape_Movement as reference to adjust the shape in Edit Mode). Rename this new object to Shape_Base.

Shape_Base

Specify Shape_Base as the custom shape of Base.

A new shape of Base

Base is not connected with the armature at moment and thus nothing happens if you move it around.

Next we create the first two constraints.
First we force COG to track the position of Base horizontally. Thus is Base moves during walkcycle, the origin of the skeleton moves together with it.

Select COG, open the Bone Constraints panel and add new constraint Copy Location.

Adding first constraint to COG

The color of COG changes to green, indicating that it has a constraint associated with it. The name field of the constraint is currently red. This indicates that the constraint is "invalid" as it's target is not specified yet.
NB! Target can be any object or a single bone from an armature. Currently we want it to be the bone Base so that COG to follows the location of it.

Chose the current armature object on Target field. A new field Bone appears. On that field chose Base.
Skeleton now "jumps" into the ground. This is because constraint was activated (it name field is now gray inidicating it is valid) and the location of COG was moved to the location of Base.(that should be at the origin).
We want COG to track only the horizontal position of Base. Thus we have to disable the Z checkbox on Copy Location panel. Skeleton now jumps to the correct location.
In addition we want to be able to manually adjust the location of COG during a walkcycle. It is needed because during a walkcycle Movement moves uniformly forward but the centre of body should swing slightly up-down, left-right and forward-backwards. To make this adjustment possible enable Offset checkbox so that only the relative movement of COG is added to the location copied from Base.

COG constraint panel

Confirm now that if Base is moved the whole skeleton moves together with it horizontally. Also we can move the skeleton separately by moving COG.

The first rigging constraint is now complete.

Next we add Copy Location constraint to Base and specify Movement as target.

Base constraint panel

As you probably do not want to move Base independently from Movement, keep X, Y and Z checked and do not enable Offset.

Confirm now that by moving Movement the whole skeleton moves along and Base cannot be moved separately anymore.

The forward movement can now be toggled on/off by enabling/disabling the Copy Location constraint of Base (small eye icon at the header of constraint panel).

Constraint enable/disable toggle

The handles and constraints moving the whole skeleton are now complete.

It is a good idea to move all rig handles to separate skeleton layer. Also all the bones that are not intended to be modified by user can be moved to separate layer so that they can be hidden during animation.