POV-Ray (The Persistence of Vision Raytracer) is high quality free raytracing renderer. Khayyam can export most models and scenes into POV-Ray file format (.pov) to allow special effects, like focal blur, global illumination and so on. Following is a mini-tutorial for scene composing and exporting.
1. Build your scene
This is really outside of this tutorial so only few hints.
As the first thing, open
Document Tree editor (
Dialogs -> Document Tree). It has property pages for the most of object types in scenes and most fine-tuning has to be done with it.
Add lights. It can be done later, but a good idea is to add at least one directional light as the first step (
Objects -> Add -> Lights -> Directional Light) because otherwise model will look plain and it is hard to understand their poses exactly.
Import objects and figures (
Objects -> Import). Currently there is support for most Illusion model formats (althoughthe ones from cell-shaded games do no look nice), MD5 (Doom3 and Quake4), OBJ, 3DS, Collada (partial) and Poser (partial) file formats.
Scale models. Default scales are mostly OK for Illusion, MD5 and Poser files, but the ones imported from other formats may be of very different scales. For scaling, select object (click on it when it has yellow highlight box) - the highlight box should turn orange. Now look at
Document Tree dialog - either object of type
Figure (poseable object) or
StaticMesh (non-poseable) should be selected.
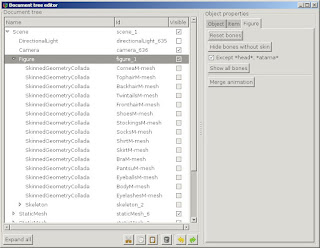 |
| Document tree showing selected figure |
Figure and
StaticMesh are toplevel containers that can include many geometries (body, hair, clothes...). Select one geometry node in tree and the content of the rightmost notebook pane should change. Each notebook page corresponds to one level in selected object type hierarchy so switching pages gives you different levels of controls.
Click on
Geometry tab and there are controls applicable to all
Geometry types, among others a scale spinner.
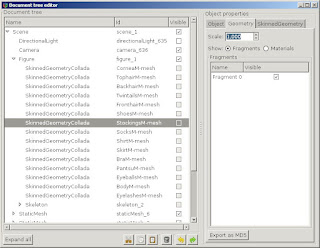 |
| Document tree with SkinnedGeometry selected Geometry property page open |
Place models. For this select model and transform control should appear. If it is not visible, try pressing
Q key for few times - it cycles the control placement between object origin, object bounding box and the center of screen. Pressing
SPACE key toggles between move and rotation controls. The same can be achieved with clicking on already selected model.
Take a look at hotkeys list (
Help -> Hotkeys) - there are some useful keyboard and mouse hotkeys, like hiding controls temporarily and so on.
Pose figures - to do this, select figure (poseable object, like Illusion character, MD5 or Collada model) and choose
skeleton tool from toolbar. If the selected object is of figure type, bluish skeleton should appear. Nothing will happen, if the object is not of posebale type.
 |
| Selected object with skeleton control |
Posing individual bones is quite similar to placing objects - although normally you do not want to move bones (it breaks body very unnaturally) but only rotate them.
Save scene. Save often, as Khayyam is still alpha and crashes a lot.
2. Set up lighting
Special lighting is the main reason you want to raytrace your scene. So take some time and try to set up lighting as well as possible - it really makes difference in final images.
Add spotlights (
Objects -> Add -> Lights -> Spotlight). There can be practically unlimited number of spotlights, but they make rendering slower. Also semitransparent objects (hair) cannot currently be lighted by more than four spotlights.
Set light direction for spotlights. The easiest method to do this, is copying light direction from camera.
- Move camera to show the scene light you want it to be seen from the spotlight.
- From document tree select SpotLight node
- From right pane select Light tab
- Click From Camera button
- From the same place you can set the light intensity and color
 |
| Document tree with Spotlight selected and Light property page open |
Ambient lighting adds undirectional light to the whole scene. It can be used to make shadow regions to have less contrast - but it tends to make scene plain.
Diffuse lighting determines the actual spotlight intensity and color.
Direct lighting if for specular highlights, but at moment it does not work reliably.
If you want to add light with soft shadows, use
Area Lights. They are similar to spotlights, but are composed of many small lights on rectangular grid. Consequently they can slow down rendering quite a lot, so by default they only have 2 x 2 nodes. To achieve softer effect, you can add more sublights from document tree dialog.
3. Export scene to POV-Ray format
To export POV-Ray scene, select
File -> Export POV-Ray Scene...
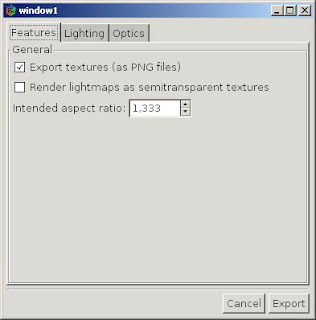 |
| POV-Ray export dialog |
The exporter dialog has three tabs. Normally you want to start from default values, as these render reasonably fast and you can check how the scene looks like. Khayyam and POV-Ray use slightly different lighting formula (actually very different if you use radiosity) so you may want to adjust light intensities and colors before doing final render.
If you have exported scene once and have not added any new objects to it, you can uncheck
Export Textures as PNG files checkbox - this saves some exporter time, as it does not have to write texture files over and over.
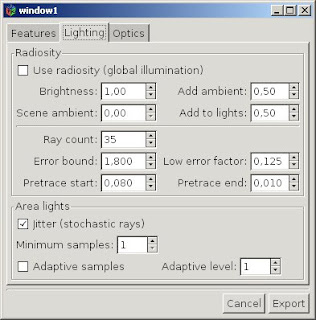 |
| Lighting properties from POV-Ray export dialog |
|
|
|
If you are otherwise content with the scene lookout, you can enable
Radiosity. This add indirect lighting to objects - i.e. light bouncing back and forth from surfaces and thus makes the sene much more natural. But it makes rendering considerably slower and can mess up lighting, as in Khayyam you cannot estimate easily, how much reflecting light changes the overall scene brightness - so experiment.
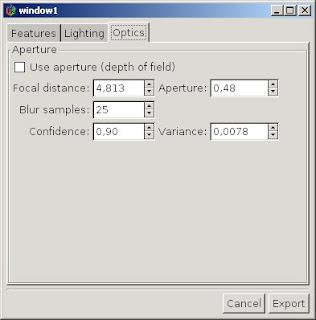 |
| Camera properties from POV-Ray export dialog |
Adding
Aperture makes objects out of focus (nearer and further) slightly blurred - how much, depends on aperture value (smaller value reduces blur). The focus point is determined by the rotation center in Khayyam (fading target image that appears if you move camera) so place it close to the objects or features you want to make sharp.
Aperture makes rendered images much more photo-like and can add a lot to the mood. But it makes rendering slower.
Click Export and save file with the extension
.pov. If you have already installed POV-Ray, it has registered itself as default handler for those file types.
4. Render it with POV-Ray
Using POV-Ray is outside this tutorial. Some hints though:
- POV-Ray opens all files in builtin editor, so to make small changes you do not have to re-export scene again.
- Rendering starts with button Run
- You can select render size from top-left menu box
- Render result will automatically be saved as png file to the same directory as pov file.
- POV-Ray uses custom scene description language that can be quite complex to understand.
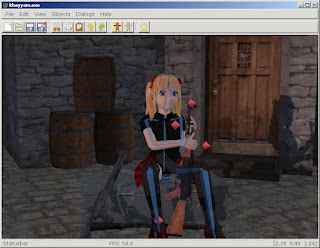
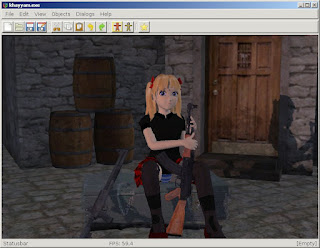 |
| Fully set up scene in Khayyam |
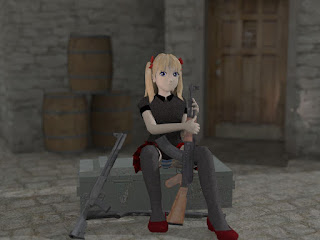 |
| The same scene rendered with POV-Ray (using radiosity and aperture). As you can see, using radiosity added lot of extra light to environment. |
And this is it! Have fun!


