Warning: Khayyam is still in very early stages of development and many models do not work. So better do not purchase expensive models unless you also have Poser/DAZ or know, that you can get them working. But you can always hunt for cheap things, bargains and free stuff (DAZ forums is a great resource for finding free models). If something does not work, I can usually fix the Khayyam code - but you have to buy given model for me so I can experiment :D
1. Loading Cr2 model
Cr2 (Character Rig) is the skeletally controlled model, that is mostly used for human figures (also animals) and more complex hairstyles.
Select Object -> Import -> Import Poser mesh
Depending on your library size it may take some time to load all previews. When done, the import dialog will open. If you have not specified Poser library path yet, the library list is empty. Click on Choose Library and select the Runtime directory of your model installation tree.
Most human figures are under Character subtree. I use DAZ People -> Victoria 4.2.cr2 as an example for the tutorial.
 |
| Khayyam Cr2 import dialog with Victoria 4.2 selected |
Click Import and the the import options dialog will open.

If importing main figure you should keep all options at default values, as shown above.
- Create skeleton will build editable skeleton for rigged model. Normally you want to keep this checked.
- Import as standalone mesh will build new toplevel figure. Unless you are adding hair or clothes to existing figure, this should also be checked.
Click Import and the figure will be inserted to main document. You can close the Import Poser dialog or keep it open, as we will use the same dialog later again.
 |
| Figure imported to main document |
As you can see, the default look is quite plain. We'll add proper materials soon to make her more attractive.
Now it is time to open the Document Tree dialog, if not already open. Select the figure (click on it, so the selection box turns orange) and choose Dialogs -> Document Tree.
 |
| Document Tree dialog with some nodes expanded |
All poseable objects have toplevel node Figure. It works as a container of one or more geometries (actual poseable objects), skeleton (a controller of those geometries) and possibly other node types.
Selecting the single geometry under imported figure opens the property page of Cr2 object. Here you can see a tree of actors and associated dials. The base V4 figure has only few morphs, but if you expand the tree and select head actor, you can access the lip sync dials, for example.
Khayyam build IK Chains automatically from model data - but does not set bone constraints. You can play with IK chains (and FK posing too) by selecting bone edit mode in main window.
NB! V4 figure has extra EyeBrow object, that partially covers the face. To turn this off, select the geometry node in document tree, select the middle Geometry property page from the notebook at right, scroll down and turn the visible checkbox off for 1_EyeBrow material.
2. Adding clothes
Clothes have to follow body position, so they are also poseable objects (of type cr2). To import clothing item, keep the main figure selected and open again Import Poser Dialog (or bring it up, if you did not close it). Select proper clothing item (it should appear in preview, if Khayyam can load it) and click Import. Unfortunately the free V4 base does not include clothes, so you have to buy these yourself or search for free ones. I am using free Bucketload 3D Sunny Bikini for current tutorial.
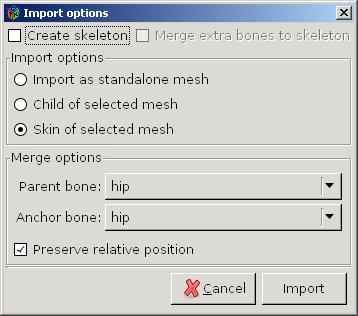
If you had the figure selected, the import options dialog has a bit different set of controls selected. Normally you want to keep the preselected values.
- Create skeleton is unselected, because the figure already has skeleton.
- Skin of selected mesh - it means, that it will be fully controlled by main figure skeleton.
- Parent bone and anchor bone are set to the lowest common bone (actor) in the hierarchies of both objects.
Click Import and clothing item should be added to the figure.
NB! If the clothing item is built for a different base figure (V3, A3...) it is quite possible, that it does not "fit". Sometimes you can adjust it with morphs, but often this does not help. You can remove wrong objects by selecting corresponding geometries in document tree and clicking on trashcan image.
Repeat clothing import for as many items as you need (well - you do not need any, but to keep this tutorial work-safe, I'll add at least bra and panties).
 |
| V4 figure with bikinis loaded |
As you can see, both the main figure and bikini are plain. We'll set material as the next step.
3. Loading materials
Predefined materials are either Pose files (pz2) or Material definition files (mc6). It is also possible to set materials by specifying texture files directly, but I'll skip this at moment (the procedure is the same, as in SBZ tutorial).
Materials are applied to geometry nodes - not the full figure. So in Document Tree Dialog, select the body geometry. On the property page, click the button Load Material...
Materials are usually either under the Pose (older version) or Material (newer) subsection of library tree. You have to select correct material type - the ones for wrong object (clothes vs. body) do not work.
 |
| Library tree with material file selected |
Click OK, and material will be imported. Usually the textures are huge, so depending on the speed of you computer and GPU it may take some time.
Material definitions are added as Pose nodes under Geometry nodes. There can be many material definitions - they are parsed from bottom to top - so it is, for example, possible to add makeup on top of body materials. To delete material definition, simply delete corresponding Pose node.
Repeat the same procedure for clothes - first select clothing geometry node and then click Load Material... (of course you have to select appropriate material file for clothing).
4. Adding hair
There are 2 types of hair - poseable (cr2) and prop (hr2).
Adding cr2 hair is exactly the same as adding clothes - select main figure, choose hair object in Import Poser Dialog and import it as skin of selected mesh. Apply material just like for clothes.
Hr2 meshes do not have skeleton, thus they are imported as Poseable elements. Usually short hair is hr2, as it simply follows the movement of the head and does care about the neck and shoulders. But this will be shown in the next tutorial.
 |
| V4, bikinis and hair with materials applied |
And this is it.
The next time I'll show, how to load poses, inject morphs and import Hr2 hair. Or you can try this yourself - it is not complicated at all, once you find the right place in document tree :D
Have fun!
No comments:
Post a Comment