Starting from the 20110402 release Khayyam can import, convert and export Biovision BVH animations from one figure/skeleton to another. Following is a mini-tutorial guiding you through the process.
You may take a look to the
overview of pose fitting algorithm to better understand which joints will be moved and how.
0. The example problem
Say, you have some good animations in BVH format and want to apply these to Poser characters. Unfortunately, skeleton topologies and/or bone orientations do not match, so they are not usable as-is.
Khayyam can actually export BVH files from supported animation types (currently only Illusion game formats). How to do this is outside of this tutorial - but as a hint look at
skinAnimation and
sequence objects in document tree editor.
1. Setting up target
Before we can convert animation to target figure, we need it's skeleton imported into Khayyam. Skeleton comes together with model, so at first we have to import Poser cr2 figure.
It is probably good idea to use reduced resolution figures for this process, because animating the whole iteration 4 (V4, M4) models can be quite slow. I will use Chibibel for current example - she has much lower polycount and can show animations without too much frame-skipping.
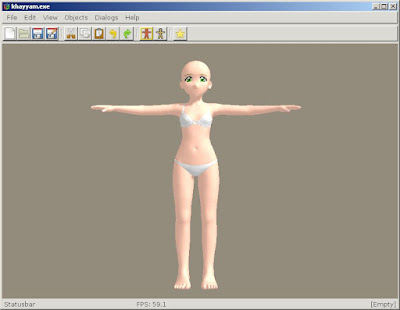 |
| Chibibel imported to Khayyam |
At moment Khayyam does not set up joint constraints automatically for cr2 objects, so you have to define at least elbow and knee constraints. Otherwise you risk, that legs or arms may suddenly bend sideways during animation.
Select imported figure, switch to pose mode and select left shinbone.
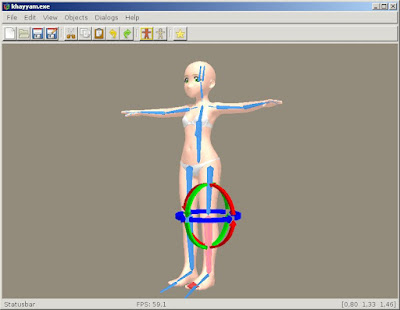 |
| Chibibel skeleton with shinbone selected |
The colors of rotation arrows mark the bone-relative axes of rotations (red - X, green - Y, blue Z). Normally knee bends only in one direction - in current case this is green rotation, i.e. Y axis. So you have to disable X and Z rotations.
Open document tree dialog. It will automatically show property page for selected bone - i.e. left shin.
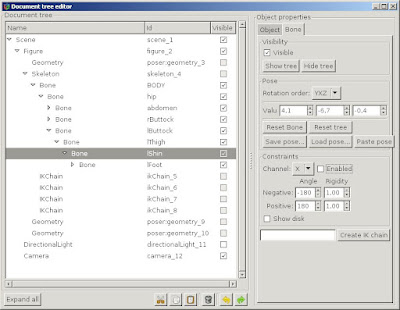 |
| The property page of left shinbone |
In
constraints frame select first
X, then
Z channel and uncheck the
Enabled box for both. This turns off the rotations around those axes.
On the same page you can set more fine-grained behavior by defining tension parameters for bones. Angles are basically maximal allowed rotations in either direction, rigidity values control, how "difficult" is given rotation. For example, knee joint moves very easily (in allowed range), but twisting shoulder is difficult, so character tries to minimize it. But if the pose is not achievable otherwise, the twisting still can happen - unlike the hard cutoff angles, that cannot be exceeded.
In current example we fortunately do not need to set up tensions.
Repeat the disabling
X and
Z channel rotations for right shinbone. Then select left forearm and disable
X and
Y rotations. The same with right forearm.
Now we have completed the minimum setup needed for successful pose merge.
2. Converting animation
In document tree select the main figure node. From the property page click on
Merge animations... to open the converter dialog.
The first step is to load source animation or pose. Click
Load animation... and select your BVH file.
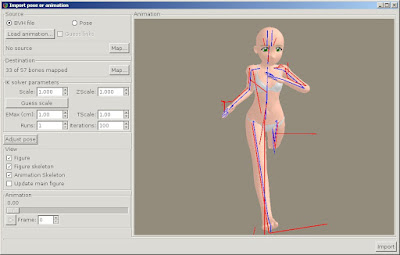 |
| Running animation applied to Chibibel skeleton |
Once the animation is loaded, Khayyam tries to adjust the destination figure to starting pose. This is iterative process and may take more than one try. So if the pose is not close to the original, you may try to click
Adjust pose few times.
The red armature is the original animation skeleton. The blue one is the skeleton of target figure. These can be toggled on and off to see clearer picture.
The other controls you may tweak are:
- Scale - changes the size of source skeleton. This should be used (together with ZScale) to make the skeletons approximately the same height - otherwise shoulders and hips can not be posed correctly.
- ZScale - changes the height of source skeleton. Thus Scale can be used to make the widths of hips and shoulders approximately right, and ZScale then to make the height of character right.
- Guess scale - Khayyam tries to determine scale from the distances between hips and shoulders. This may or may not work correctly.
- EMax - tha maximum error tolerance - if the combined distance between poseable chains (body, limbs...) is less than EMax, iterative pose refinement will stop. Smaller value may give better adjusting but makes the process slower.
- TScale - the scaling factor of bone tensions. Usually this can be 1 for default tensions or some smaller value (0.01) if all tensions have been set up in skeleton.
- Runs - number of distinct runs of IK solver
- Iterations - the maximum number of tries in each run
Playing with these may give better results. If animation is jerky, increasing the number of runs often helps. If limbs do not track the originals well, lowering
TScale may help. Experiment!
Also, you should keep in mind, that while hips and shoulders are placed using the absolute positions, other joints are adjusted by directions.
Previous blog entry describes the process in more detail.
Khayyam knows the bone names of some common skeletons and can determine the corresponding standard parts automatically. But sometimes it may not know, which standard humanoid bone certain name corresponds to. In that case you have to define bone names manually, using the bone mapper tool. This can be done by clicking
Map buttons in source and destination skeleton frames.
Not all skeletal bones are 1:1 mappable and this is not even needed. What is important is, that standard joints of movable body parts are mapped correctly.
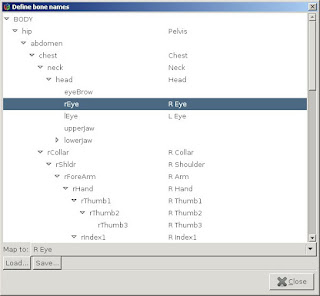 |
| Bone mapper dialog for Poser skeleton |
In the example above, you can see the bone mapper dialog for standard Poser biped skeleton (V4, M4, Chibibel). In the left-hand tree there are all bone names that appear in skeleton file, at right are the corresponding Khayyam standardized body parts. Once set up the mapping can be saved and loaded (actually the last saved mapping will be loaded automatically).
Once the bone mappings are set up (and saved), click
Close and the conversion solver will update itself.
You can play the animation with current conversion parameters using play button.
3. Importing animation to document
Once you are satisfied with the conversion results, click
Import. Khayyam will then generate a tree of animation objects as child nodes of parent Figure node.
Hint: You can set
NRuns to bigger value and
EMax to lower value for import so the actual conversion will be done with maximal accuracy.
The object of interest for us is a
sequence node, that will be created as the last child of
figure. It defines the imported animation sequence and can be played from play button on its property page.
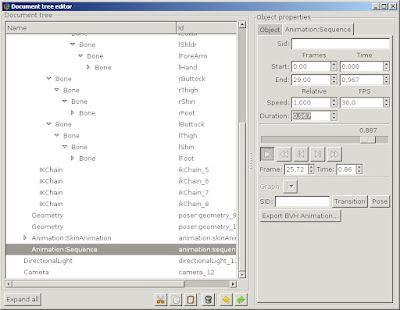 |
| The imported animation sequence object |
If the imported sequence works as intended, you can export it to new BVH file. This new file uses already the proper skeleton of the target figure.
And that's it. I have many ideas how to make this process smoother, so stay tuned!


